The Read More that I mean here is cut out the article (post) to a certain extent on the home page, label page and archive page.
There are 3 ways to create read more in blogger that we can do, they are:
- Make read more using jump break manually
- Make read more automatically without script using code from blogger
- Make read more automatically using auto read more script for blogger
Why do I discuss 3 ways to create read more in blogger?
As knowing these 3 ways, then we can consider, choose and decide which way we are going to apply on the blogger blog that we have, because each method has advantages and disadvantages itself.
Okay, let's start one by one
1. How To Create Read More On Blogger Manually Without Edit Template
This first way is the simplest and most basic to make read more in blogger.At this method we don’t have to edit the blogger template that we use, this read more does not require it. It is because the tools we need are already available at the post editor blogger.
The Simple Ways to Create Read More On Blogger
Here are the steps you can do to create read more using this method- Sign in to your blogger dashboard
- Create a post as usual until complete
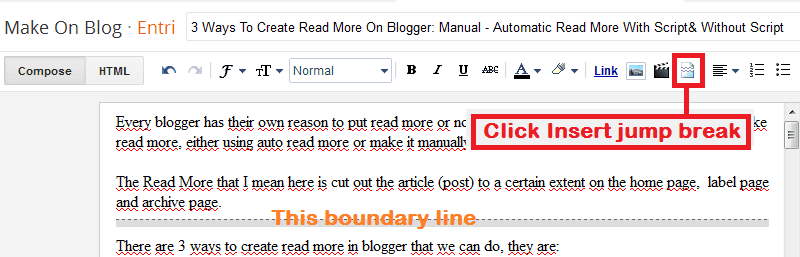
- Determine the extent which you want to cut the post and then place the cursor there
- Click the icon Insert jump break, then you will see the boundary line, which means that the content of the post before the deadline that will be seen on the home, label page and archive page
- Lastly please click publish and please see the results on the home page of your blog.
Do the same ways to another posts until all posts have read more.
Note: If you, friends, use blogger template that was created with read more automatically, then this method will not work.
2. Create Read More With Automatic Thumbnail Without Script Use Code From Blogger
If the first way is manual step to create Read More, then the second way is how to create an automatic read more in blogger.This means that if we use this way, then we do not need to create read more manually like the steps above, because all the post will automatically have read more, whether it is a new post or posts that had long published.
The Ways to Create Automatic Read More Without Script
The steps that we have to do to create read more thumbnail automatically are as follow:- Sign into blogger dashboard
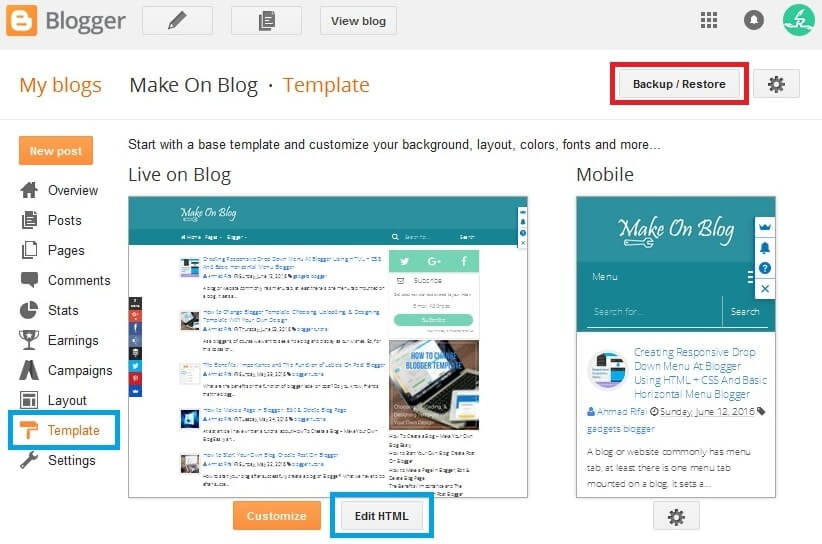
- Open Template page
- Backup your blogger template first, the ways: click Backup / Restore → click Download Full Template.
- Click Edit HTML, then we will be taken to blogger template editor page.
<b:if cond='data:post.hasJumpLink'>
<div class='jump-link'>
<a expr:href='data:post.url + "#more"' expr:title='data:post.title'><data:post.jumpText/></a>
</div>
</b:if>
<b:includable id='post'var='post'>, if you have found it, then please remove it, and then save template change.Furthermore, please find the code
<data:post.body/> which is not far below the code <b:includable id ='post'var ='post'>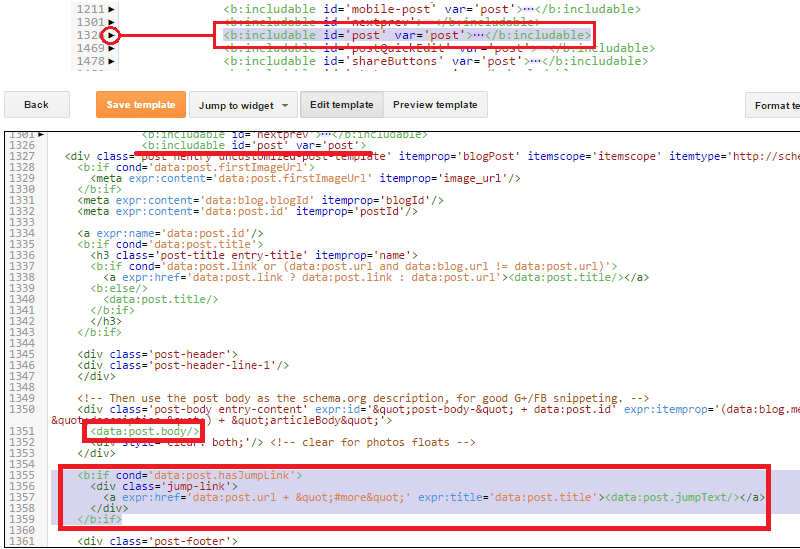
<b:if cond='data:blog.pageType != "item"'>
<b:if cond='data:post.snippet'>
<b:if cond='data:post.thumbnailUrl'>
<div class=' post-thumb'>
<style type="text/css">. post-thumb img {float: left; margin: 0 10px 5px 0;}</style>
<img expr:src='data:post.thumbnailUrl'/>
</div>
</b:if>
<data:post.snippet/>
<b:if cond='data:post.jumpLink != data:post.hasJumpLink'>
<div class='jump-link'>
<a expr:href='data:post.url' expr:title='data:post.title'><data:post.jumpText/></a>
</div>
</b:if>
<b:else/>
<data:post.body/>
</b:if>
<b:else/>
<data:post.body/>
</b:if>
<style type="text/css">.thumb img {float: left; margin: 0 10px 5px 0;}</style>: is CSS code that make thumbnail located on the left, please modifications as needed, if you don't like the position, you may move it or combine it to another css code were before </head> section of your blog template.<img expr:src='data:post.thumbnailUrl'/>: is the code that will display images / thumbnails should be wrapped with the code<b:if cond='data:post.thumbnailUrl'>and</b:if>, so the code is basically like this:
<b:if cond='data:post.thumbnailUrl'>
<img expr:src='data:post.thumbnailUrl'/>
</b:if>
<data:post.snippet/>: is the code that displays a summary of the article content of post that should be covered by the code<b:if cond='data:post.snippet'>and</b:if>, so the code is essentially like this:
<b:if cond='data:post.snippet'>
<data:post.snippet/>
</b:if>
<a expr:href='data:post.url' expr:title='data:post.title'><data:post.jumpText/></a>: is the code to create Read More thumbnail, which must be wrapped code<b:if cond='data:post.jumpLink != data:post.hasJumpLink'>and</b:if>, so the basic code is like this:
<b:if cond='data:post.jumpLink != data:post.hasJumpLink'>
<a expr:href='data:post.url' expr:title='data:post.title'><data:post.jumpText/></a>
</b:if>
How to change the thumbnail size of with javascript or jQuery
Default thumbnail on read more without script is 72px width and 72px height, and if you would like the thumbnail in different size, then you can change without or with pure JavaScript or you can also use jQuery.How To Change Post Thumbnail Size Without JavaScript / jQuery
The first way that we can do to change the thumbnail size of blogger post is using code from blogger, ie<img expr:src='data:post.thumbnailUrl'/>The thumbnail feature using code above actually is not a new thing in blogger, but recently blogger adds a little touch that can be used to resize post thumbnail by writing code / syntax template like this
resizeImage (url, size, ratio)As we already know that the default size of thumbnail post blogger is 72 x 72 pixels, and we want to turn it into a 300 x 300 pixels, then we can use this syntax
resizeImage (url, size, ratio)
<img expr:src='resizeImage(data:post.thumbnailUrl, 300 , "2:1")'/>
resizeImage (url, size)
<img expr:src='resizeImage(data:post.thumbnailUrl, 300)'/>
How To Change Thumbnail Size Using Pure JavaScript
To change the size of post thumbnail on the home page, label and archive then we can use the following JavaScript
<b:if cond='data:blog.pageType != "static_page"'>
<b:if cond='data:blog.pageType != "item"'>
<script type='text/javascript'>
//<![CDATA[
function resizeThumb(parentID, size) {
var parent = document.getElementById(parentID),
image = parent.getElementsByTagName('img');
for (var i = 0; i < image.length; i++) {
image[i].src = image[i].src.replace(/\/s72\-c/, "/s" + size + "-c");
image[i].width = size;
image[i].height = size;
}
}
resizeThumb('main-wrapper', 200);
//]]>
</script>
</b:if>
</b:if>
</ body> or </head>The part that we must note in the script above is this
resizeThumb ( 'main-wrapper', 200);main-wrapper is ID field posts, and 200 is a new thumbnail size. The code above will change the thumbnail size of 72 × 72 pixels to 200 × 200 pixels.If the ID column of the post is a
post-wrapper and you wanted to change the thumbnail to be 300 x 300 pixels, so you have to change the code becomes like thisresizeThumb ( 'post-wrapper',300);
How To Change Thumbnail Size Using jQuery
To change the thumbnail size using jQuery, the first step is we have to add the jQuery Library on blogger template, the ways:On blogger template editor page please add following jQuery Library before code
</ head> or </ body>. The jQuery Library script is:<script src='https://ajax.googleapis.com/ajax/libs/jquery/3.1.0/jquery.min.js/'>If your blogger template already has jQuery Library then you don't need to add the jQuery script above anymore, and please go to the next step.
Once your template has jQuery Library script please add the following code before
</ body>
<b:if cond='data:blog.pageType != "static_page"'>
<b:if cond='data:blog.pageType != "item"'>
<script type='text/javascript'>
//<![CDATA[
function resizeThumb(el, from, to) {
$(el).each(function() {
$(this).attr({
'src': $(this).attr('src').replace('/s'+from+'-c/', '/s'+to+'-c/'),
'width': to, 'height': to
});
});
}
$(function() {
resizeThumb('.post-thumbnail', '72', '200');
});
//]]>
</script>
</b:if>
</b:if>
resizeThumb ('Information :.post-thumbnails', '72', '200');
.post-thumbnail: is selector thumbnail area, please replace with selector thumbnail area that corresponds to your template- 72: Was the original size of thumbnails (leave it alone)
200: Is a new size for the thumbnails, which means from 72 pixels to 200 pixels changed. Please change as desired.
3. How to Create Automatic Read More Using Auto Read More Script For Blogger
The third way about how to create read more in blogger is almost same with the second way, the difference is the third way use auto read more script for blogger, while the second method does not use script.Steps to Create Read More Using Script
Here are the steps that you must be done to make auto read more in blogger using the script:- On the blogger dashboard please open template page
- I recommend you to backup the blogger template first, the way: click Backup / Restore → click Download Full Template.
- Click Edit HTML, then you will be taken to blogger template editor page.
<b:if cond='data:blog.pageType != "static_page"'>
<b:if cond='data:blog.pageType != "item"'>
<style type='text/css'>
.post-footer {display: none;}
.post {margin-bottom: 10px; border-bottom: 1px solid #E6E6E6; padding-bottom: 20px;}
.readmore a {text-decoration: none; }
</style>
<script type='text/javascript'>
posts_no_thumb_sum = 490;
posts_thumb_sum = 400;
img_thumb_height = 160;
img_thumb_width = 180;
</script>
<script type='text/javascript'>
//<![CDATA[
function removeHtmlTag(strx,chop){
if(strx.indexOf("<")!=-1)
{
var s = strx.split("<");
for(var i=0;i<s.length;i++){
if(s[i].indexOf(">")!=-1){
s[i] = s[i].substring(s[i].indexOf(">")+1,s[i].length);
}
}
strx = s.join("");
}
chop = (chop < strx.length-1) ? chop : strx.length-2;
while(strx.charAt(chop-1)!=' ' && strx.indexOf(' ',chop)!=-1) chop++;
strx = strx.substring(0,chop-1);
return strx+'...';
}
function createSummaryAndThumb(pID, pURL, pTITLE){
var div = document.getElementById(pID);
var imgtag = "";
var img = div.getElementsByTagName("img");
var summ = posts_no_thumb_sum;
if(img.length>=1) {
imgtag = '<span class="posts-thumb" style="float:left; margin-right: 10px;"><a href="'+ pURL +'" title="'+ pTITLE+'"><img src="'+img[0].src+'" width="'+img_thumb_width+'px" height="'+img_thumb_height+'px" /></a></span>';
summ = posts_thumb_sum;
}
var summary = imgtag + '<div>' + removeHtmlTag(div.innerHTML,summ) + '</div>';
div.innerHTML = summary;
}
//]]>
</script>
</b:if>
</b:if>
<style type = "text / css"> and </ style> as necessary.Script part that need to be considered and modified as desired:
posts_no_thumb_sum = 490; → number 490 is a value that specifies the number of characters of text (summary) if the post does not have picturesposts_thumb_sum = 400; → number 400 is a value that specifies the number of characters of text (summary) if the post has no imageimg_thumb_height = 160; → 160 is a high-value size imageimg_thumb_width = 180; → 180 is the value of the size of the image width
Then look up the following code, and then delete the following code if there
<b:if cond='data:post.hasJumpLink'>
<div class='jump-link'>
<a expr:href='data:post.url + "#more"' expr:title='data:post.title'><data:post.jumpText/></a>
</div>
<b: includable id = 'post' var = 'post'> and </b: includable>Now find the
<data: post.body/> not far under the code <b: includable id = 'post' var = 'post'>
<b:if cond='data:blog.pageType != "static_page"'><b:if cond='data:blog.pageType != "item"'>
<div expr:id='"summary" + data:post.id'><data:post.body/></div>
<script type='text/javascript'>createSummaryAndThumb("summary<data:post.id/>","<data:post.url/>","<data:post.title/>");</script>
<span class='readmore' style='float:right;'><a expr:href='data:post.url'>Read More »</a></span>
</b:if></b:if>
<b:if cond='data:blog.pageType == "item"'><data:post.body/></b:if>
<b:if cond='data:blog.pageType == "static_page"'><data:post.body/></b:if>
Read More » with another text you want.It's completed and the final step click Save Template button.